
Tackle Data Dictionaries with Tableau Prep

Many business systems have adopted field naming conventions in order to ensure consistency
across fields. For example, I used to work with JD Edwards. One of the most
common tables is F4211, the Sales Order Detail table. The table has over 250
columns. Here are the first 10:
SDKCOO
SDDOCO
SDDCTO
SDLNID
SDSFXO
SDMCU
SDCO
SDOKCO
SDOORN
SDOCTO
Each column name is prefixed with “SD” (for “Sales
Detail”) and followed by a Data Dictionary key. For example, KCOO stands
for Order Company, DOCO is the Document Number, DCTO is the Document
Type, and LNID is the Line Number.
Every table in the database has this structure. The
reason for this design is that it makes it easier for developers to ensure
consistency across the entire database. For example, Line Number will always
use the LNID data dictionary item, regardless of what table it’s in.
Systems that leverage such data dictionaries also commonly have other strange constraints. Some may store numbers without the decimal points (as implied decimals), some may use different formats for dates, etc.
Systems that leverage such data dictionaries also commonly have other strange constraints. Some may store numbers without the decimal points (as implied decimals), some may use different formats for dates, etc.
Of course, JD Edwards is just one example. Most big systems
tend to use data dictionaries—as do many smaller systems—since it makes managing
the database much easier. Unfortunately for us, it makes analytics really
difficult as you need to change the column names to more logical,
business-focused names and often need to perform various transformations on the
data in order to address date formats or implied decimals, for example.
The best way to address this, in my opinion, is by
building a data warehouse. In your data warehouse, you can give the fields
logical names and perform all the various transformations. However, not every
organization has made an investment in a data warehouse and even those who have
may find themselves in need of a direct database connection from time to time.
So, in this blog, I’m going to talk about some of the challenges of using data
controlled by a data dictionary. Then I’ll show you how to use Tableau Prep to transform your data into a more usable
format in an automated way.
Data Dictionaries
In this example, I’m going to work with
Superstore data. But, I’ve modified the data to be structured according to a data
dictionary. Here’s the dictionary for my table:

And here’s a snippet of the Orders table
converted to this structure.

In this case, my fields are all prefixed
with “OR” (for “Orders”), followed by my four-digit data dictionary item.
---------------------------------------
Note: In order to make it easier for
you to work with this data, I’ve created both the Orders table and the
Dictionary table in my publicly-accessible SQL Server database, which you can
access using the following details:
Server Name:
Authentication: SQL Server Authentication
Login: SQL
Password: SQL
The Orders table is called Orders
with Dictionary and the dictionary table is called Dictionary.
---------------------------------------
While we could certainly work with this
directly in Tableau, it presents us with a few challenges. First, the field
names are basically just codes. In order to make this more usable to us as
developers and, more importantly, our end users, we will want to rename the
columns to use business terminology. That will require us manually looking up
each data dictionary item and then providing a better name.
We’ll also need to address any differences
in the way fields are stored. For example, ORORDT (Order Date) is stored in a normal
data format, while ORSHDT (Ship Date) is stored in MMDDYYYY format and ORIVDT
(Invoice Date) is stored in YYYYMMDD format. And do you see anything strange
with ORSAMT (Sales Amount)? On the surface, it just looks like a normal number,
right? But, if you look at the dictionary, you’ll see that it actually uses 2 implied
decimals, which means that a number stored as 66588 is actually 665.88. I’ll
tell you right now that you don’t want to be the person who overstates sales by
100 times!! So, to make these adjustments, you’ll need to manually refer to the
data dictionary then create calculated fields to transform these fields into
the correct values.
While renaming fields and performing
the various transformations on data types may not be a huge deal for a small
table like this one, it can be an absolute nightmare for larger tables. Imagine
manually adjusting all of the 250+ columns in the F4211 table I mentioned
earlier!!
Tableau Prep
So, is it possible to create an automated
way of transforming your data based on a data dictionary? Yes—we can do it with
Tableau Prep! I’m going to take you through the process step by step.
First, we’ll connect to our Orders table.
Next, in order for this process to work, we’re going to need a field that acts
as a unique identifier. If your table already has a unique ID then you can use
it. If your table does not have a single unique ID field, you can use a combination
of fields that defines a unique key (though it’s easier to create a single
field as I’ll show you momentarily). If there is no unique key, then you can
analyze your data to see if you can find some sort of combination of fields
that is unique—if that’s not possible, then this method won’t work…sorry!
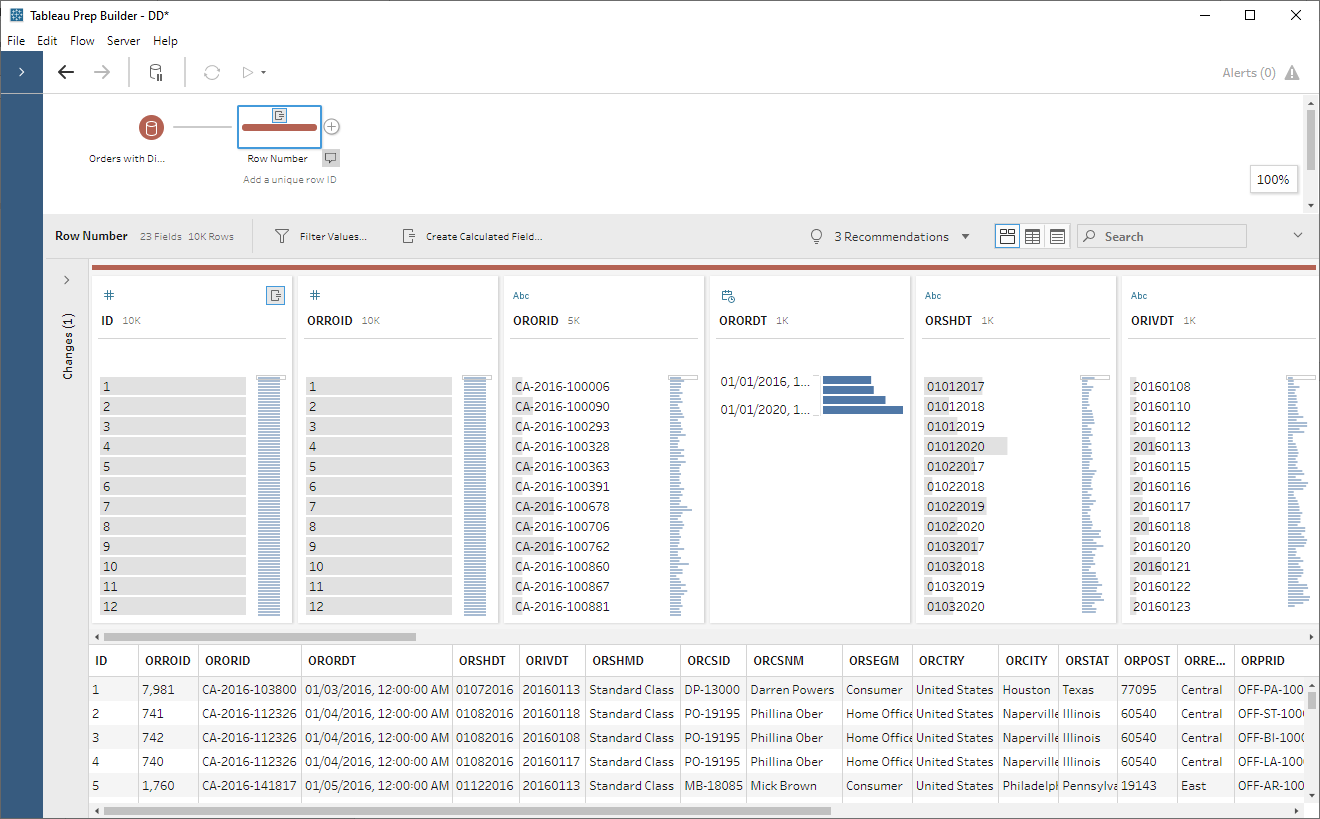
My orders table does have a unique ID
field already, ORROID (Row ID), so I could use that, but I’d like to show you
how to create an artificial ID using Tableau Prep’s new analytical function,
ROW_NUMBER. Again, this doesn’t really make a lot of sense since I already have
Row ID, but let’s create one anyway. To do this, I’ll create a calculated field
like this:
{ ORDERBY [ORORDT] ASC, [ORORID] ASC: ROW_NUMBER()}
This will essentially sort the data by
ORORDT (Order Date) then by ORORID (Order ID), in ascending order, then create
a numeric row number. Note: You can order the data however you like using ORDERBY and you can also partition the data in order to restart the row numbering.
Note: The above is only available in version 2020.1.3 and later. For more details on the above syntax, see Create LOD and Rank Calculations.
Note: The above is only available in version 2020.1.3 and later. For more details on the above syntax, see Create LOD and Rank Calculations.
Through the rest of our steps, we’ll
use ID as a unique identifier, which will allow us to pivot and unpivot the
data, while keeping the data together in a single record.
Our next step will be to pivot our
data. We’re going to pivot every field except ID so that we can then join to
the data dictionary.
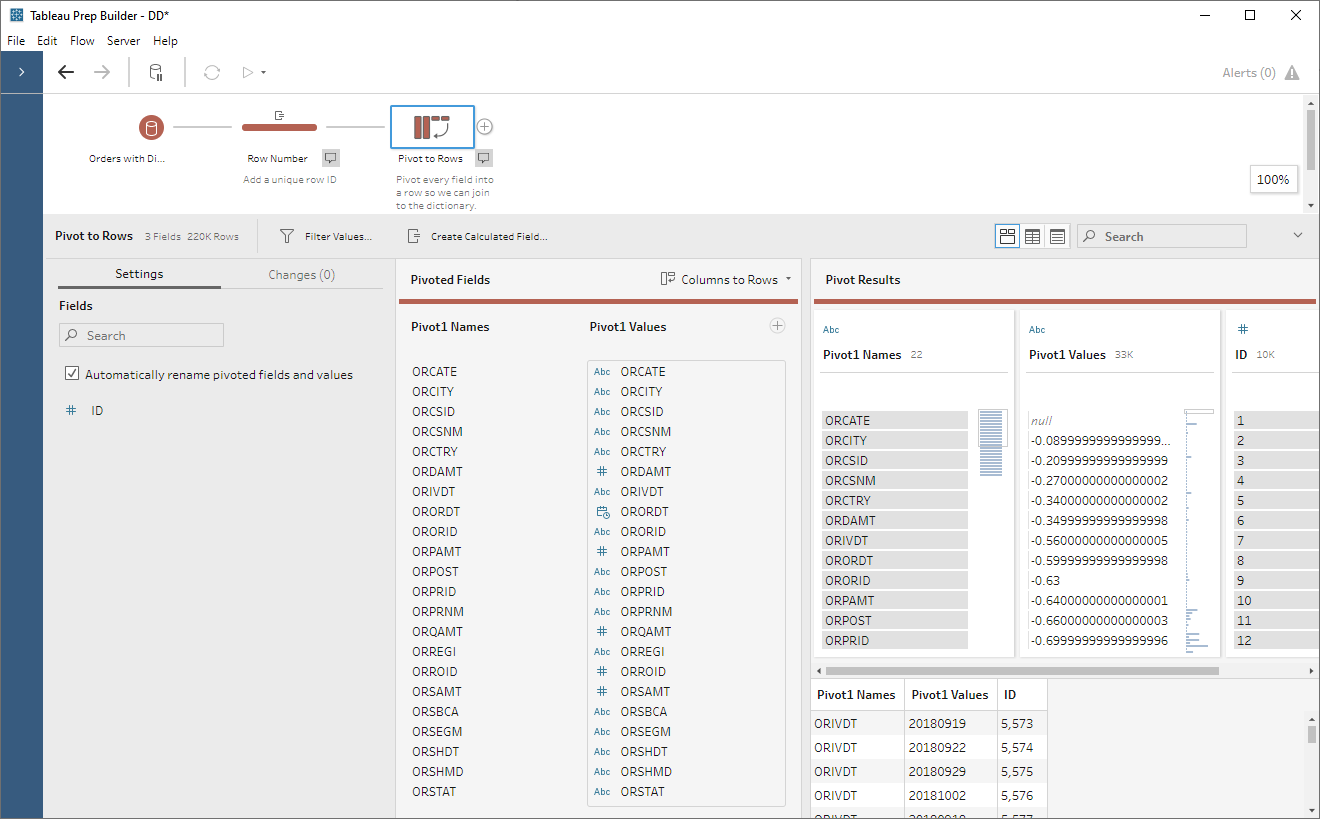
Note: You may have noticed above that numeric values look a bit strange after the conversion to text. For example -0.64 becomes -0.64000000000000001. This has to do with the fact that they are stored as floating point numbers. Floating point numbers do not maintain exact precision, which means that, internally, they are not stored as exactly the number they mean to represent. In most cases, this should have little to no impact on you. However, you should be careful in situations where a high level of precision is required. If, for example, you need precision to 10+ decimal points, then this method of transforming your data may increase the risk of slight variances and should probably be avoided.
Now we’ll add a clean step and do a bit of cleanup. First, I’ll rename Pivot1 Values to Values. Then, I’ll create a new field called Fields which will remove the two-digit prefix from the field names:
// Remove two-digit
prefix from field names.
MID([Pivot1 Names],3)
Finally, I’ll remove Pivot1 Names:
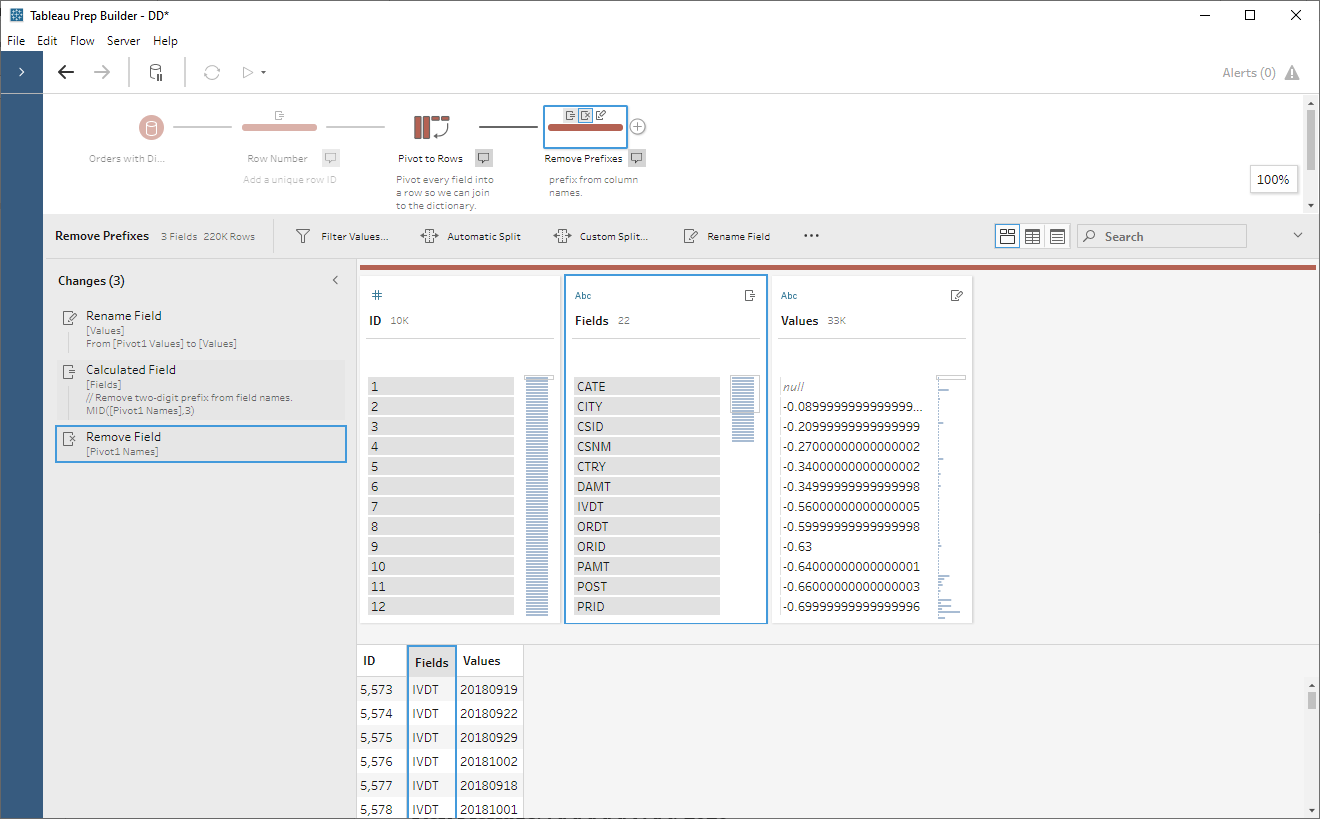
Now that we have fields with just the
data dictionary item in them, we can join to the Dictionary table on Fields
= Dictionary.
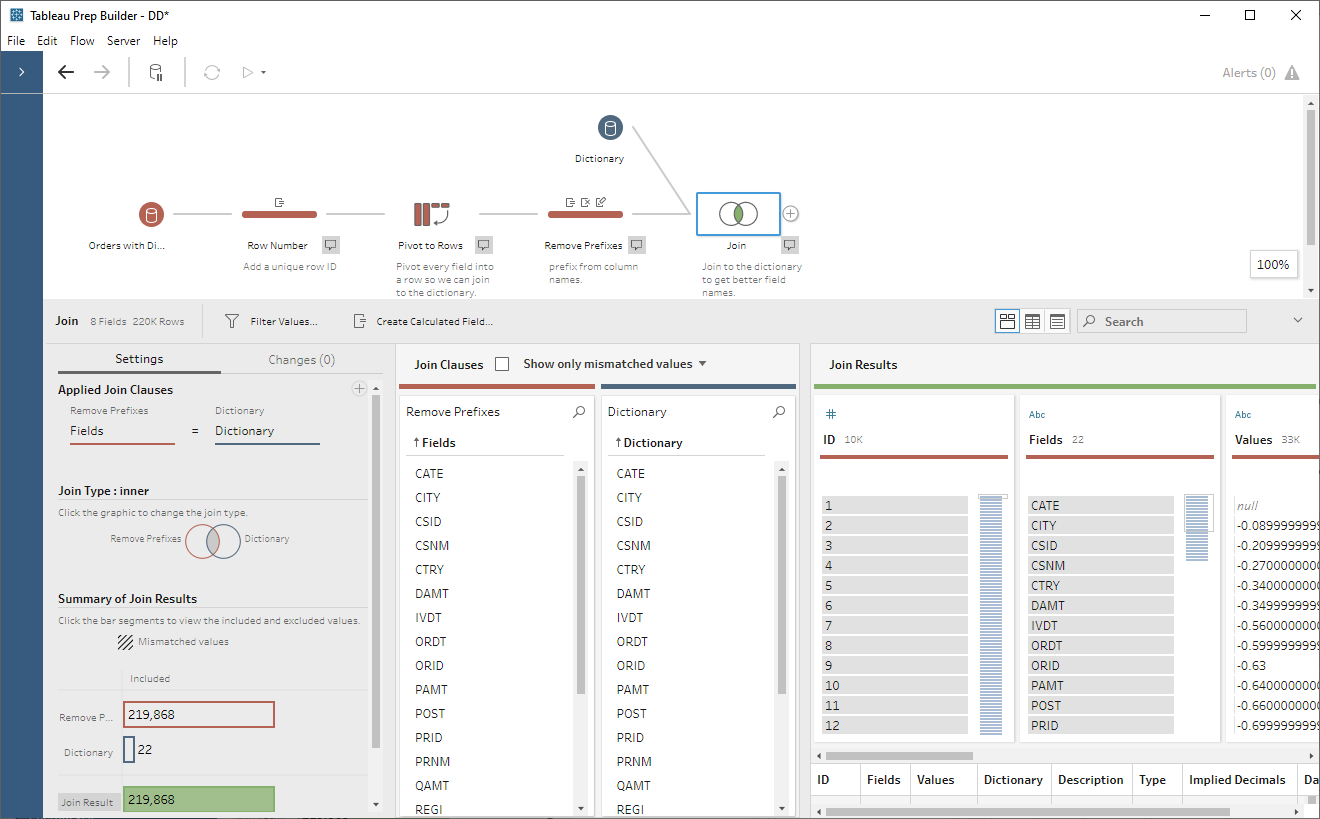
We now have all the details for each
data dictionary item and can use them in our transformations. The first thing
we’ll do is perform the date and implied decimal conversions. The number
conversions should be fairly easy as we’d just divide the number by 10d
where d is the number of decimals. But, when I tried this, Tableau Prep
gave me a collation error. This seems to be due to my converting a string to a
number then back to a string. I’ve reported this to Tableau so they can correct
it in a future version. But, for now, we’ll need to use a method that avoids
conversion to numbers. Unfortunately, this a little more tricky. I’ll do it in
two steps. First, I create a calculated field called Values - Decimal Step 1:
// Step 1: Pad with
enough zeros so we can move the decimal.
IF [Type]="Decimal" THEN
// Deal with implied decimals.
IF LEFT([Values],1)="-" THEN
"-00000000"
+ REPLACE([Values],"-","")
ELSE
"00000000"
+ [Values]
END
END
We’re padding the number with leading zeroes just to make
sure we have enough space to move the decimal. Now, we’ll finish the transformation
by creating another calculated field, Values – Decimal:
// Step 2. Move the
decimal point.
IF [Type]="Decimal" AND [Implied
Decimals]>0 THEN
LEFT([Values - Decimal Step 1],LEN([Values - Decimal Step 1])-[Implied Decimals]) + "." + RIGHT([Values],[Implied Decimals])
ELSE
[Values - Decimal Step 1]
END
This essentially just breaks the string
at the decimal point, moves it to the left by two spaces, then reconstructs the
string.
For the dates, we’ll use the following
calculated field, Value – Dates, to convert from the internal formats.
Note: I had the same collation issue when I converted these to dates then back
to strings, so this calculation does everything with strings only.
// Put dates in
YYYY/MM/DD format.
IF [Type]="Date" THEN
CASE [Date Type]
WHEN "MMDDYYYY" THEN RIGHT([Values],4) + "/" + LEFT([Values],2) + "/" + MID([Values],3,2)
WHEN "YYYYMMDD" THEN LEFT([Values],4) + "/" + MID([Values],5,2) + "/" + RIGHT([Values],2)
ELSE [Values]
END
END
For dates that are not stored as dates, this
will convert them to YYYY/MM/DD which can easily be converted to a date by
Tableau. For those fields already in a date format, we’ll just leave the field as
is.
Finally, we’ll create another field, Values
– Other, for the remaining data types that do not require any transformation.
// Values for other
fields.
IF [Type]<>"Date" AND [Type]<>"Decimal" THEN
[Values]
END
We now have the following:
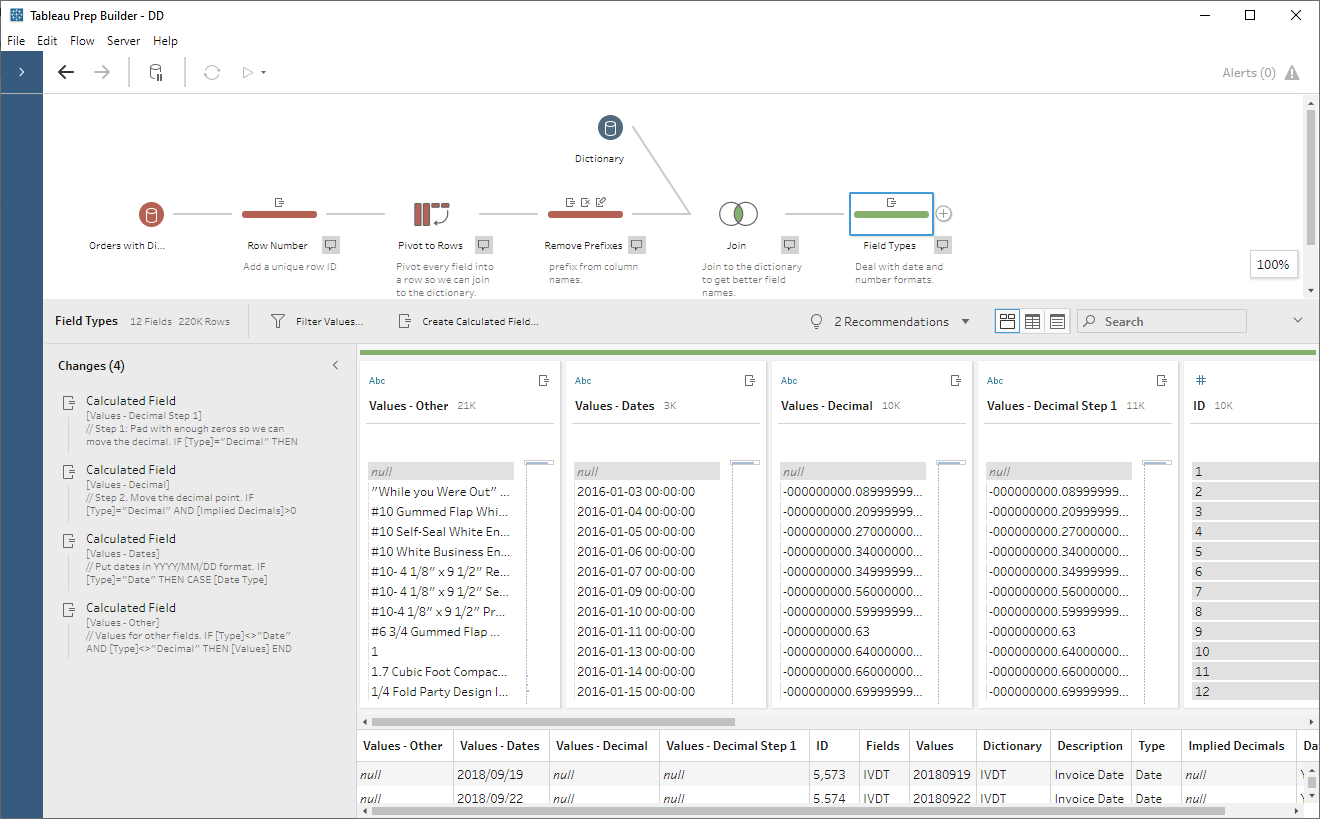
In another clean step, we’ll merge
these three values fields into a single field.
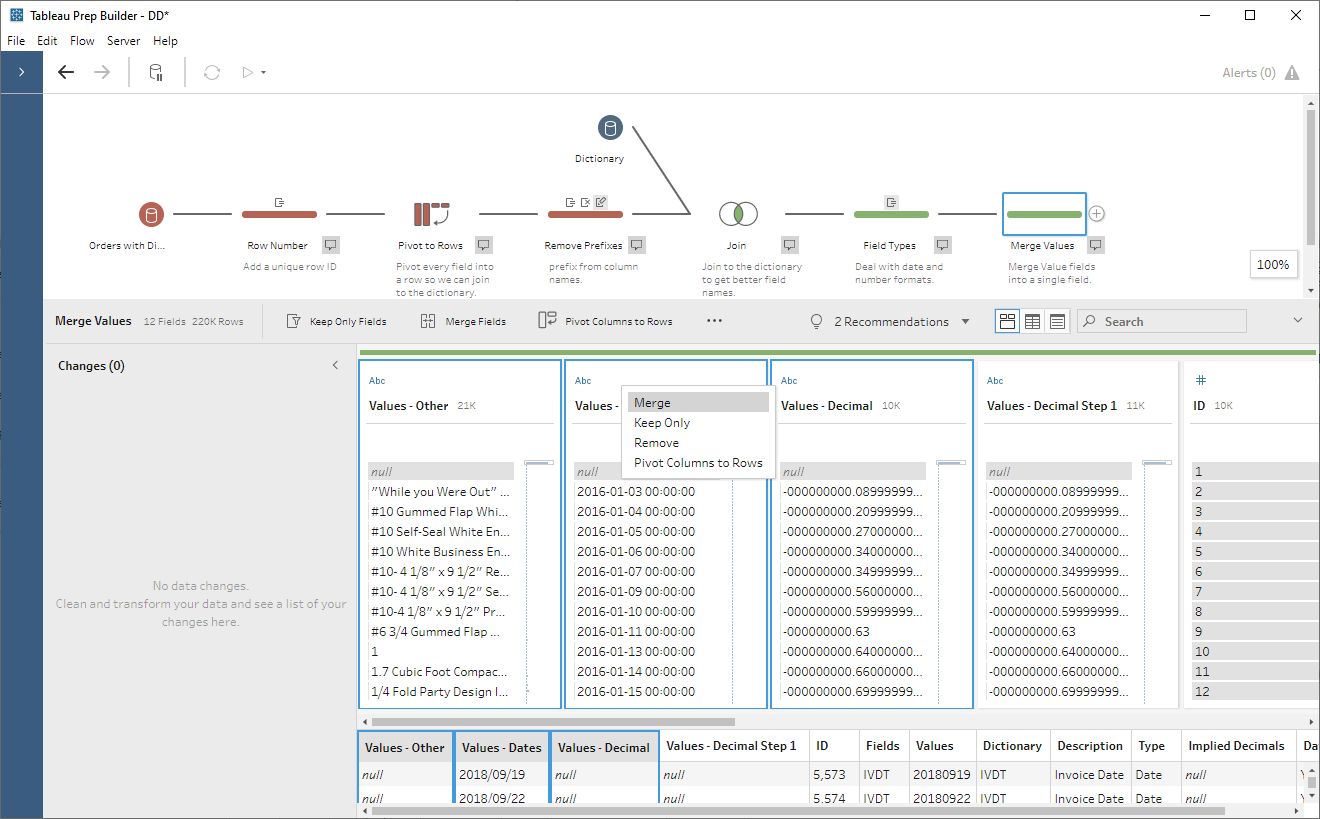
This field will take the name of the
first field. In my cases, this is Values – Other. So, I’ll rename this
to Values – Final. We can then remove all the other Values fields.
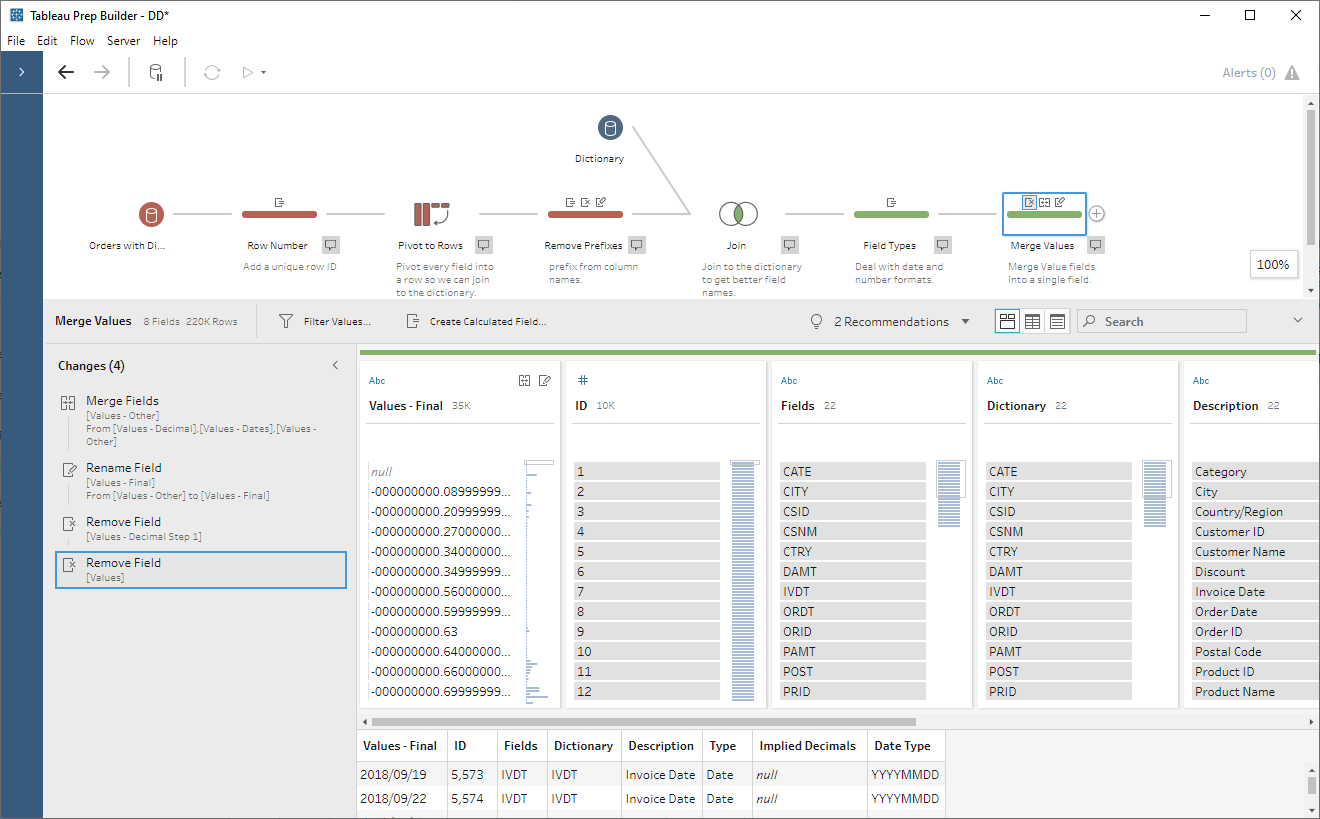
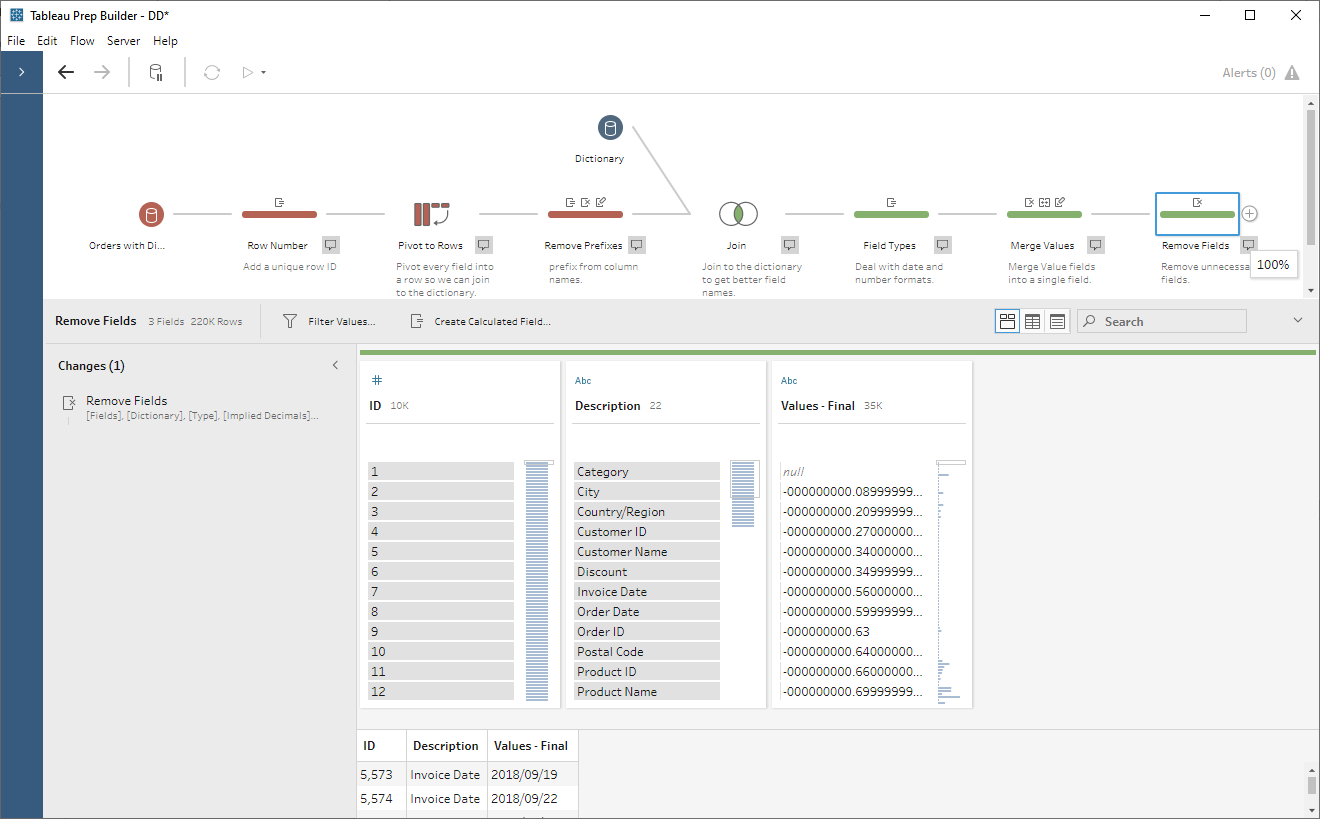
Now that we’ve done all of our
transformations, the only fields we need are ID, Description (will
become our new field name), and Values – Final, so we’ll remove all the
other fields in a new clean step.
If you’ve followed along this far and
are confused at how we’re going to get this back into a columnar format, this
next step is where it should all come together. We’re going to add in a pivot
step then pivot all of our rows back to columns using Description as the
new field name. In the pivot step, we’ll change it to a “Rows to Columns” pivot,
then drag Description to Pivoted Fields. Tableau Prep will then
enumerate all of the values in this field so it can convert them to field
names. We’ll also drag Values – Final to Field to aggregate for new
columns. By default, Tableau Prep will use a count aggregation.
Change this to MIN or MAX. While this may seem like you’re going to eliminate some
values, it won’t. This is because we created that unique ID in the first step
and the aggregation will always operate at that level of detail. Our data now
looks like this:

Our columns now have nice names and the
data has been converted from internal formats to formats that can be recognized
by Tableau!!
Warning: It was pointed out to my by Jonathan Drummey that pivoting rows to columns is not truly dynamic, meaning that as new row values are added, the pivot will not pick them up automatically and create new columns. For this blog, that simply means that columns that are added to the table will not be picked up automatically. If new columns are added, you'll need to recreate the rows to columns pivot step. Otherwise, this should have limited impact. Note: If you'd like to see the rows to columns pivot be dynamic, please up-vote the following: rep Rows to Columns: dynamically add and/or remove pivoted values based on the current data
Warning: It was pointed out to my by Jonathan Drummey that pivoting rows to columns is not truly dynamic, meaning that as new row values are added, the pivot will not pick them up automatically and create new columns. For this blog, that simply means that columns that are added to the table will not be picked up automatically. If new columns are added, you'll need to recreate the rows to columns pivot step. Otherwise, this should have limited impact. Note: If you'd like to see the rows to columns pivot be dynamic, please up-vote the following: rep Rows to Columns: dynamically add and/or remove pivoted values based on the current data
Our last step is to convert the data
types as all of our fields are currently strings. There are a couple of options here. One of the things I dislike about
file-based data sources (Excel, csv, etc.) is that they do not enforce data
types. This means that Tableau has to guess the data types. But, in this case,
we can use this to our advantage. If you output the data to csv, then connect
to the csv in Tableau Desktop, it will guess at the data types and, because we’ve
formatted numbers and dates in a certain way, Tableau should convert them quite
well as shown below:

But, in many cases, an extract may be more
desirable. In that case, my recommendation is to add a prefix to the Description
field upstream in the Prep flow, which will indicate the data type.
// Prefix the field
name with an indicator of the data type in order to make it easier to change
data types at the end.
LEFT(LOWER([Type]),3) + " " + [Description]
Then, before you output the file to
hyper, manually change all the data types. Obviously, this is still a manual
process, but you’ll only need to change those fields that are not strings
(numbers, dates, etc.) and they will be easily identifiable due to the prefix
added above. The result looks pretty much the same as the CSV output.
The Final Product
Finally, just to help you see the differences, here's a before and after of the original data vs the final output.


The Final Product
Finally, just to help you see the differences, here's a before and after of the original data vs the final output.
So, there you have it. By pivoting our columns
to rows, joining to the dictionary, performing various transformations, then
pivoting the rows back to columns, we can create a clean data set in a mostly
automated fashion. That said, this method isn’t perfect. Our data set was
relatively small (about 10,000 records), but the process of pivoting every
column of a large data set could put a lot of pressure on Tableau Prep. Imagine
if our F4211 table had 1 million records. When we pivot its 250+ columns to
rows, that will result in 250+ million rows! But, in many cases, this should be
a viable approach. And, once you create the basic structure of your flow, you
should be able to easily adapt it for other tables in your data source.
If interested in seeing my workflow, I’ve
made the CSV and Extract flows available here: Packaged Workflows
Ken Flerlage, February 10, 2020


Ken, thank you for giving more details on unique identifier. I've been looking for this one for some time. Basically, now I can get rid of my manual calcualted fields retreiving 'Unique Value' in Excel.
ReplyDeleteYes, this is a great new feature. Opens up so many new possibilities!
DeleteI am trying to adapt a data dictionary to update description and values which are often numeric codes for categorical variables. Is this crazy talk? I primarily use giant Census datasets...
ReplyDeleteYeah, that's a common scenario that I intended to help with this blog. It should work, I think. But if the data sets are huge, that could be a bit problematic since it's going to pivot all those columns to rows first. This sounds like an interesting use case, so I'd be happy to take a close look if you'd like to email me directly. flerlagekr@gmail.com
Delete