
Split & Pivot Comma-Separated Values

In my time teaching and
helping people with Tableau, I often come across situations where some key piece
of data is locked in a comma-separated value (it could also be any other kind of delimited field). Take, for example, the following event
data. We have two tables. The first—People—contains a list of people who could
be invited to an event:

The second—Events—contains
a list of events.

We have a single record
for each event, but the list of invitees is contained in a comma-separated
field called Invites. Ideally, we’d like to break our Event table
into separate rows—one for each invitee:

This would allow us to
then join Events to People, resulting in a table that improve our
ability to analyze the data.

To do this, we need to
first split the Invites column, then pivot the results. And that’s what I’ll be
showing you in this blog.
Split & Pivot with Desktop
Splitting and pivoting data
with Tableau Desktop is a bit hacky and has a few drawbacks. So, if Tableau
Prep is available to you, I strongly suggest going that route as it will eliminate
these drawbacks. That said, let’s start by doing this in Desktop.
A couple of notes before we begin. First, there are, of course, ways you could perform these operations with some manual work, but my goal here is to find an automated method—one that would allow you to publish a data source to Tableau Server and refresh automatically, without the need for any manual intervention. Second, if you’re not familiar with the concept of pivoting, then I’d recommend reading my blog, 3 Ways to Pivot Data for Tableau before reading the remainder of this post.
A couple of notes before we begin. First, there are, of course, ways you could perform these operations with some manual work, but my goal here is to find an automated method—one that would allow you to publish a data source to Tableau Server and refresh automatically, without the need for any manual intervention. Second, if you’re not familiar with the concept of pivoting, then I’d recommend reading my blog, 3 Ways to Pivot Data for Tableau before reading the remainder of this post.
The basic steps we’ll
take are to first split our field into multiple values, then pivot them. Sounds
easy enough, so let’s give it a try. I’ve connected to the Events table.
I’ll now perform a custom split on the Invites field.
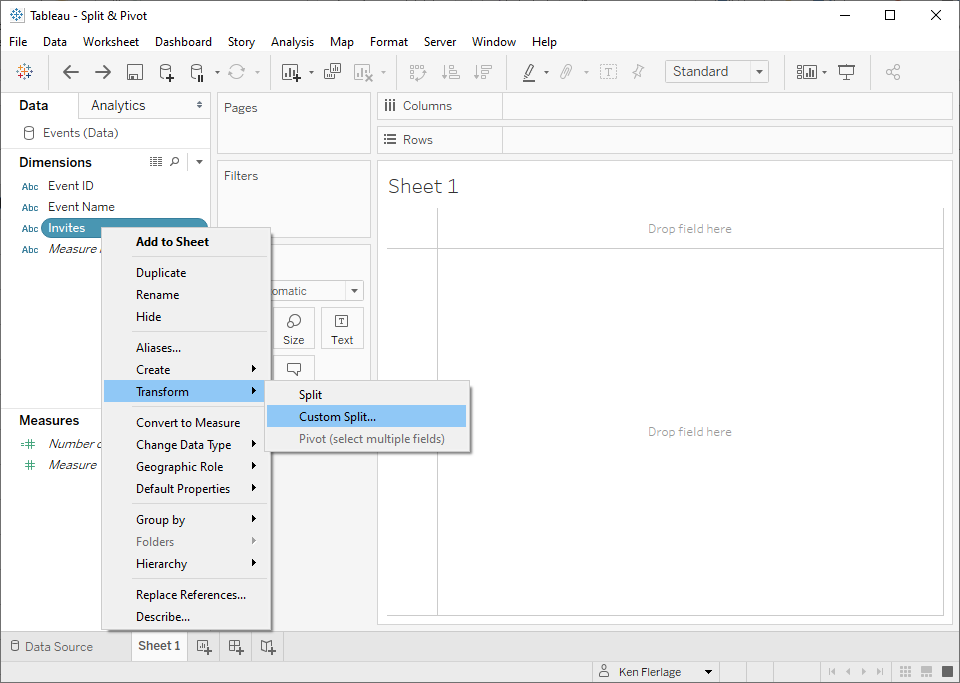
In the Custom Split
dialog, I’ll use a comma as the separator and choose to “Split Off” all columns.
Tableau will then create three calculated fields.
Why 3 fields? That’s because
the maximum number of values in our Invites field is three. Were there
more comma-separated values in one of the fields, then Tableau would create
additional split calculated fields.
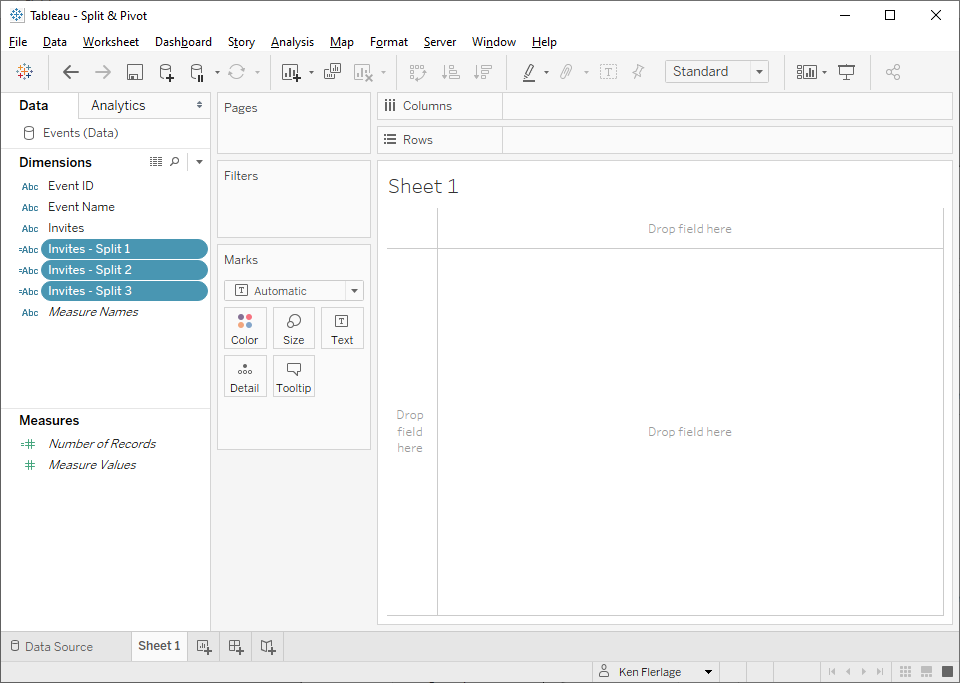
Now let’s try to
pivot on our three new fields. We’ll go back to the data pane, select the three
fields, right-click and choose the “Pivot” option.
But, the option is not
there. This is because you cannot pivot on a calculated field in Desktop. So,
how can we perform this pivot? That’s where we need to get a bit hacky. We’ll
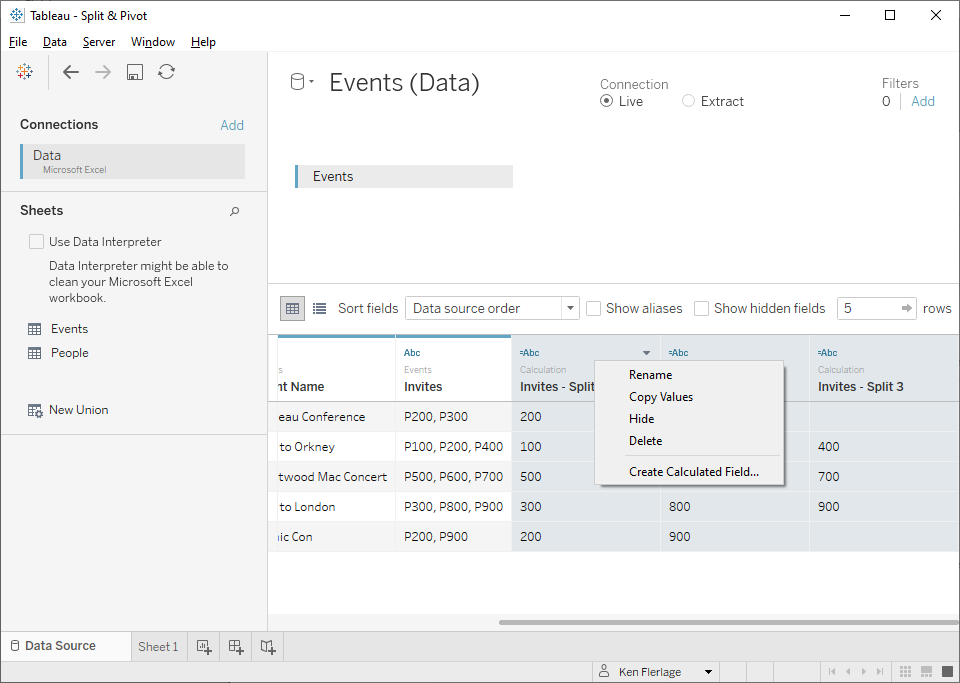
start by unioning the table to itself three times—once for each of our split fields. Now, we’ll
create the following calculated field:
Invite
// A single invite
for each row.
CASE [Table Name]
WHEN "Events" THEN [Invites -
Split 1]
WHEN "Events1" THEN [Invites - Split 2]
WHEN "Events2" THEN [Invites - Split 3]
END
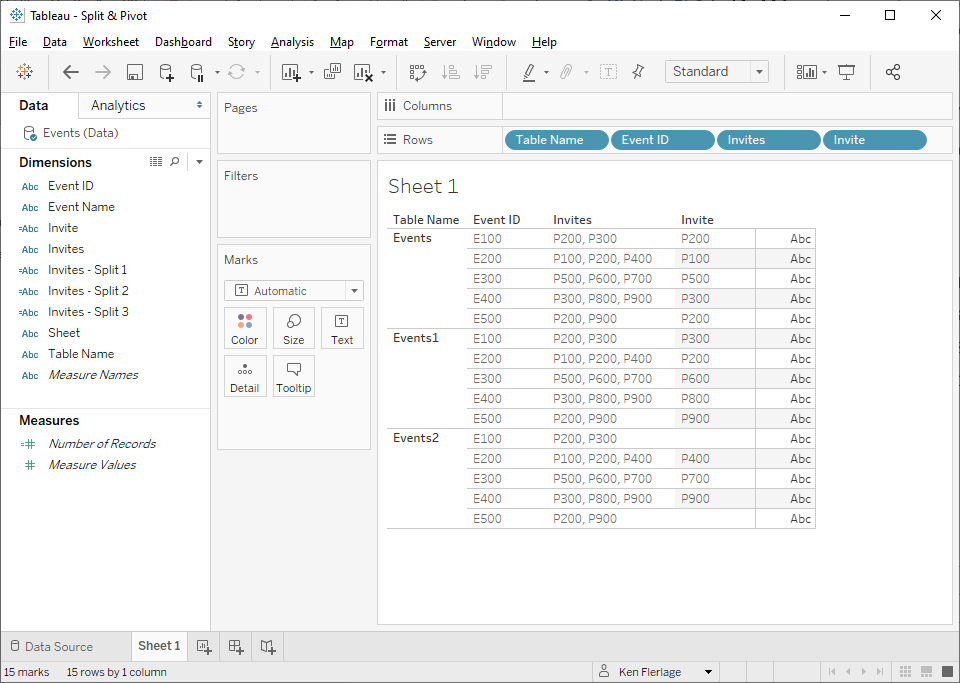
This is basically just
choosing one of the split fields based on the unioned tables, allowing us
to have just one invite for each row as can be seen here:
The last step would be to
then join this to the People table so we can get each person’s name.
Ideally, we’d be able to use our new Invite field, but Tableau doesn’t
allow us to use a named calculated field in a join. So, we need to use a
join calculation. To do that, we’re going to have to repeat the logic above,
combining everything into a single field. We can do that by copying the script
for Invite then replacing each reference to the split columns with the
actual logic from those calculated fields:
// A single invite
for each row.
CASE [Table Name]
WHEN "Events" THEN TRIM(SPLIT([Invites], ",", 1))
WHEN "Events1" THEN TRIM(SPLIT([Invites], ",", 2))
WHEN "Events2" THEN TRIM(SPLIT([Invites], ",", 3))
END
We then use this in a
join calculation:
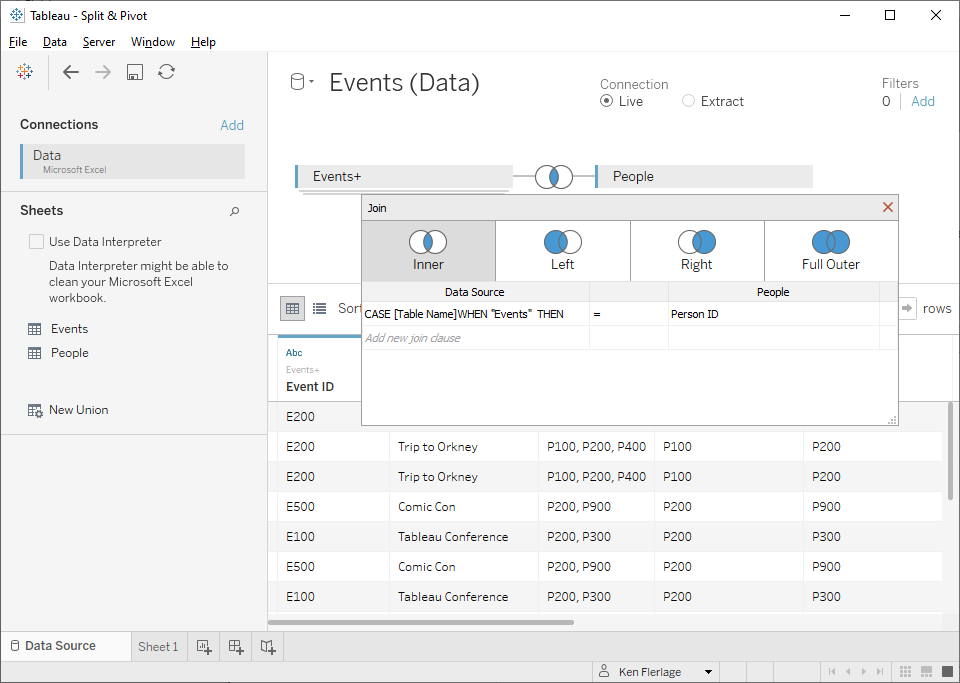
And, with that, we have
our data in the correct structure:
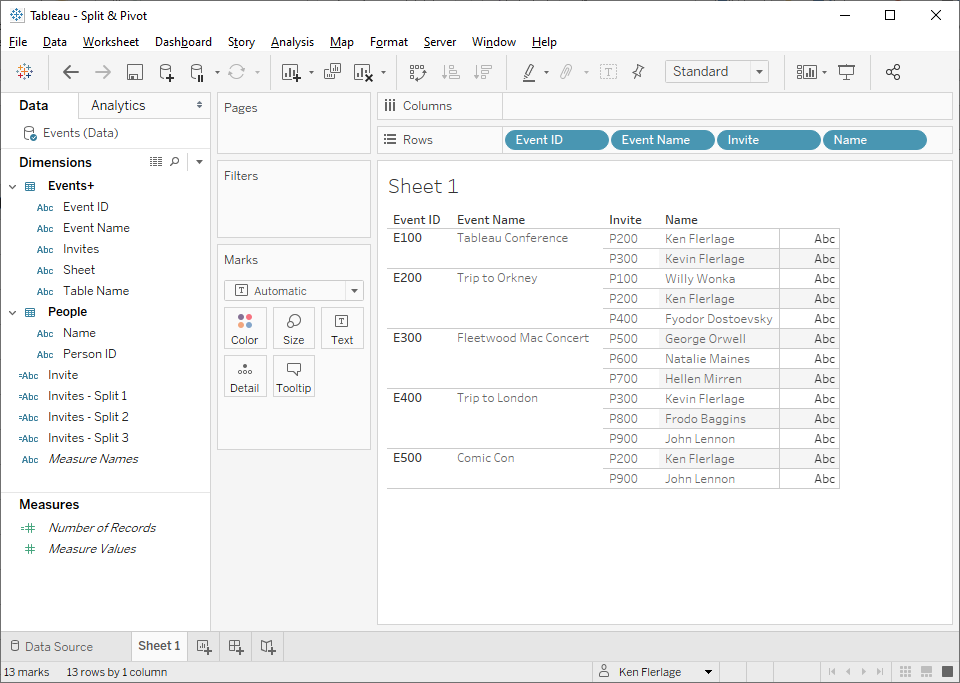
Whew! That was a bit
painful. As you can see, there are a number of drawbacks to this method. One is
that it requires you to union your table to itself once for the maximum number
of comma-separated values. This is okay if that number is known and is
relatively low. If the number of values is unknown, then this could be very
problematic. Another issue is that you are duplicating the logic of the calculated
field. This is not a huge deal, but it’s something I tend to try to avoid. And,
generally speaking, this is not a very automated or elegant approach. So, for a
better solution to this problem, let’s turn to Tableau Prep.
Split & Pivot with Prep
We’ll start by connecting
to our data and bringing in the Events table. Next we’ll add a clean
step and perform the same custom split as we did in Desktop:
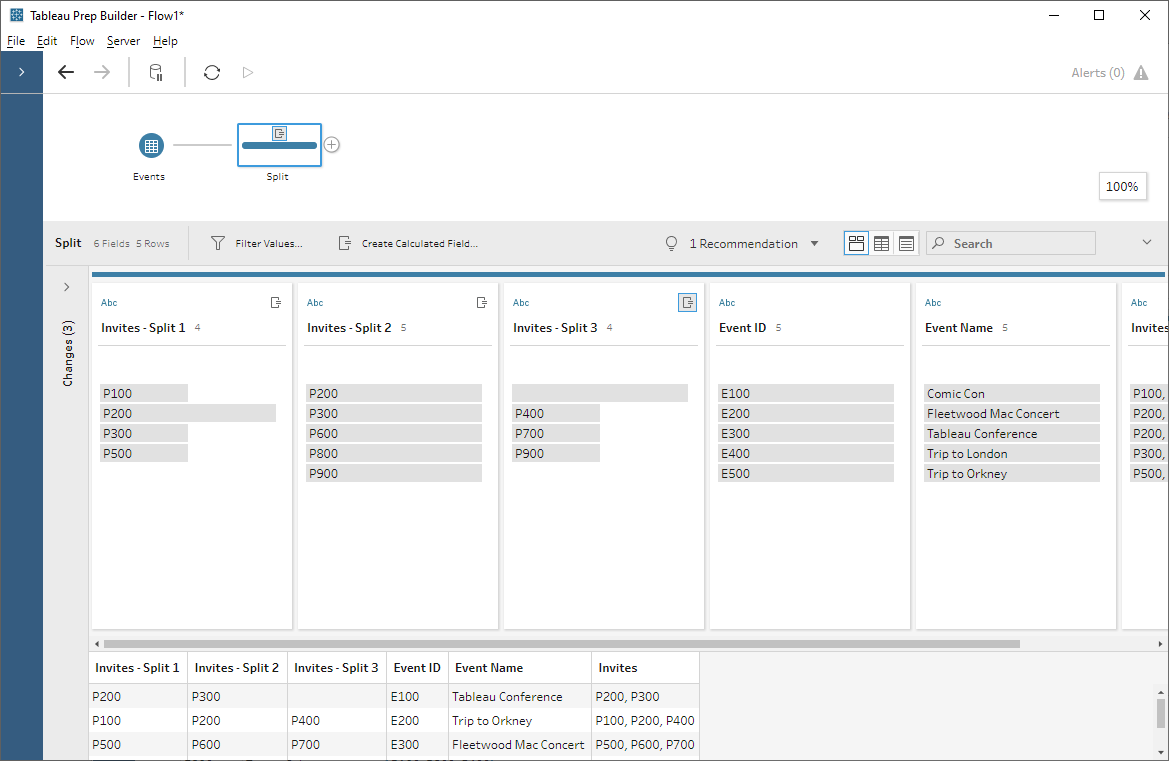
That will produce very
similar results—three split fields:
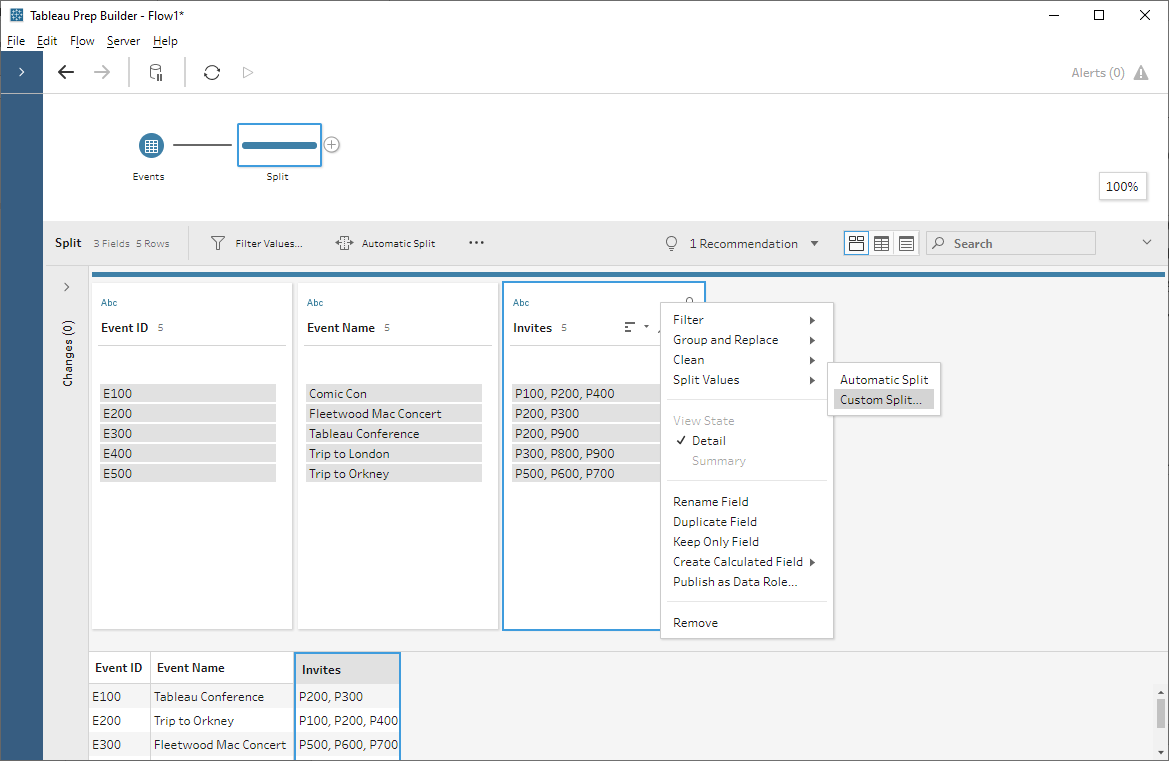
We now have to pivot the
data and this is where Tableau Prep really shines. Unlike Desktop, Prep can perform
the same operations on calculated fields as on regular data fields. Add a pivot step and choose the “Use wildcard search to pivot” option. With
this option, we can search based on a field name. The advantage here is that it
will be automated—if we eventually have 4 comma-separated values in one of the Invites
fields, then Tableau will automatically include that fourth split field in the
pivot. We’ll search on “Invites - Split” and Prep will automatically bring in
matching fields.
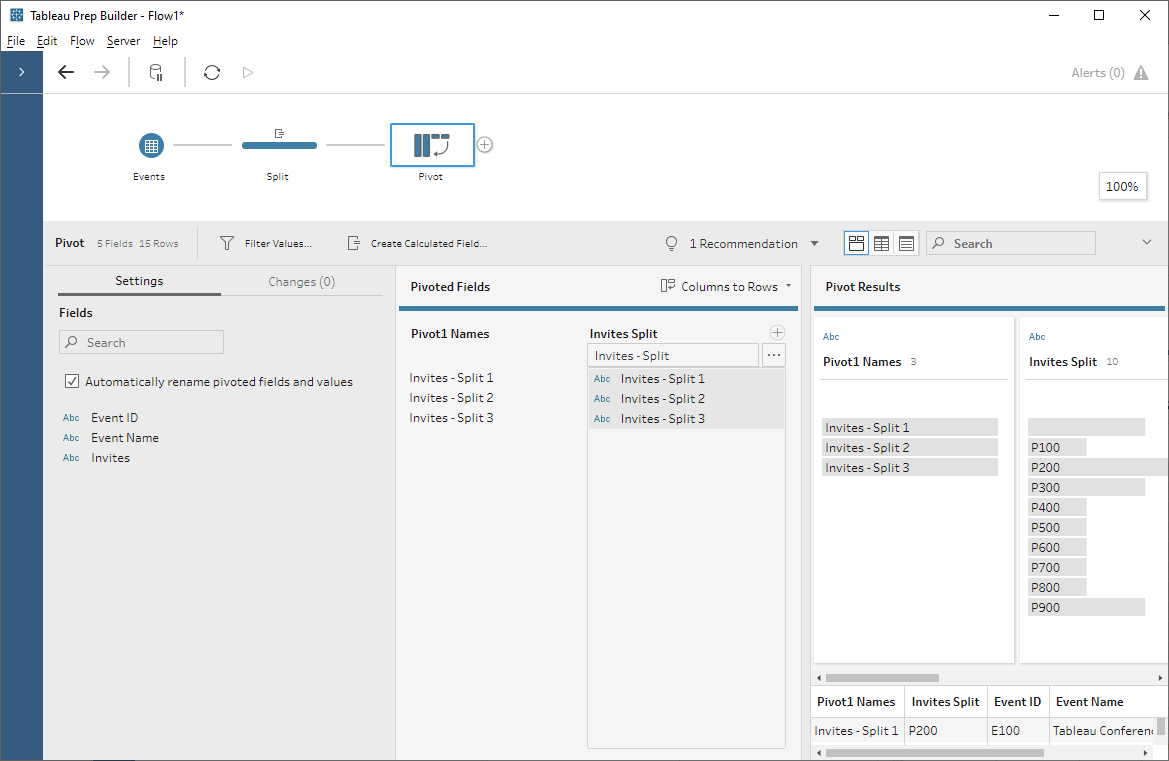
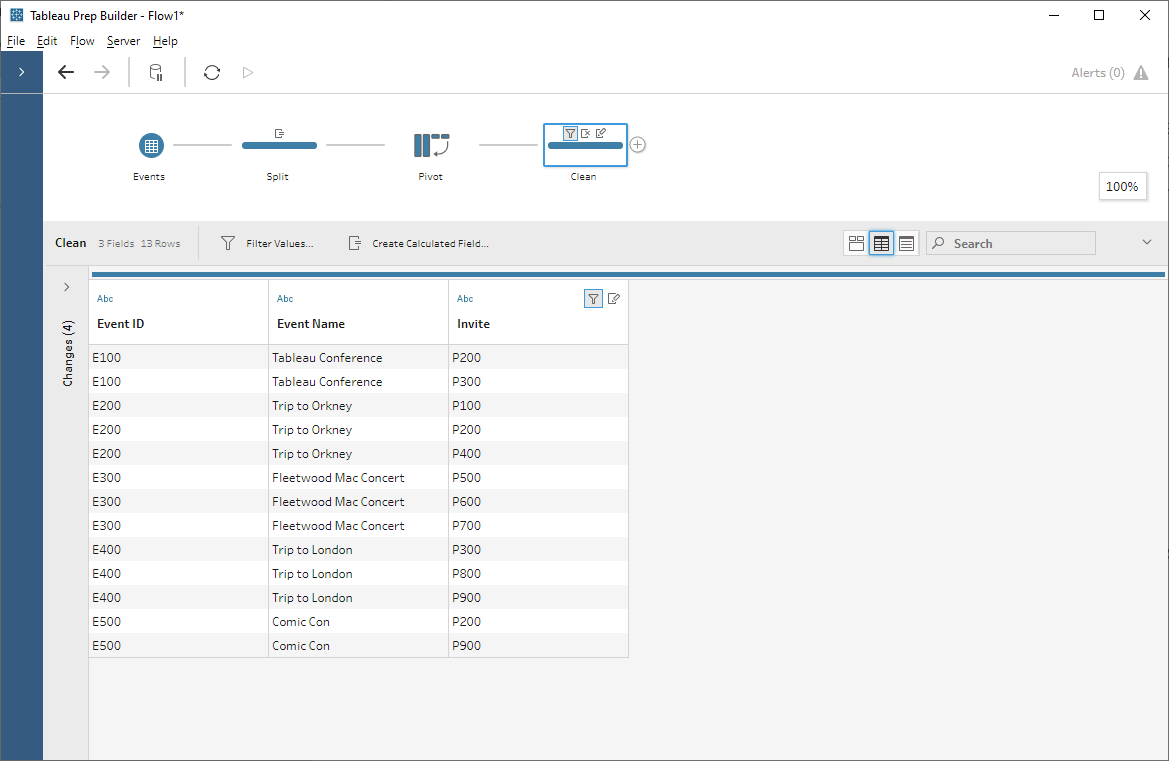
Now let’s add a clean step
and take a look at the structure of our data.
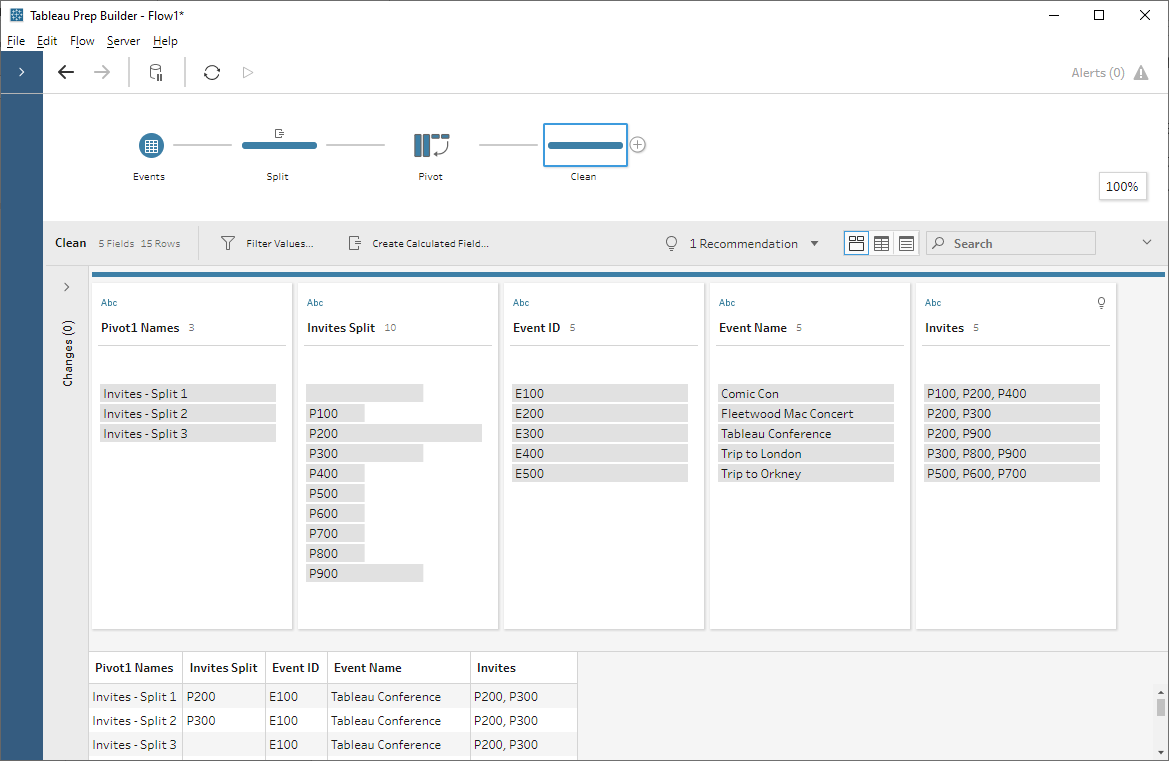
We have some fields that
are no longer required, such as Pivot Field Names and Invites, so
we’ll remove them. We’ll also rename the Invites Split field to Invite.
Finally, you’ll notice that we have a blank item in the Invite field.
This is because some of our rows only had 2 comma-separated values. So, we can
just filter these out (Note: This isn’t technically required as they will be
removed when we join to the People table since we’ll be using an inner
join).
The last thing to do is
join this to the People table using a join step.
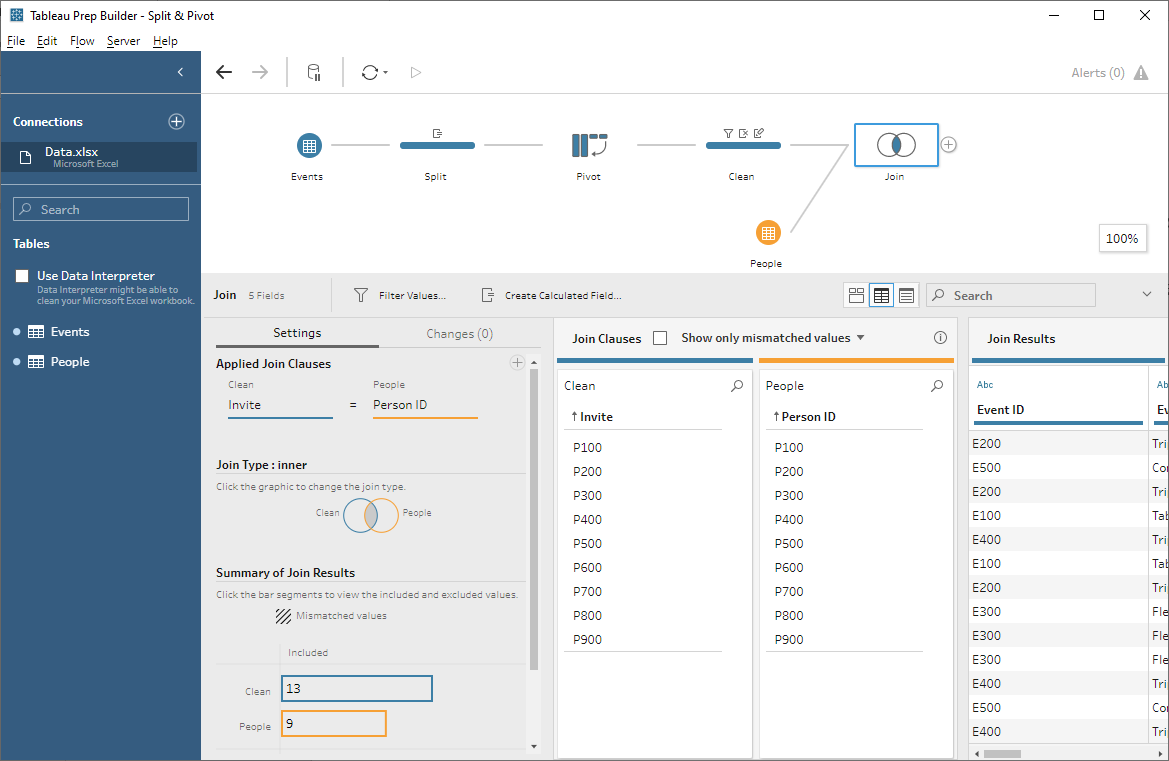
Then we can output the file:

As you can see, this
method is easier, less hacky, and much more automated than the Desktop approach.
Thus, if Prep is available to you, I highly recommend that you use it instead
of trying to make this work in Desktop. Your future self will thank you!
As always, thanks for
reading! I hope you find these techniques useful in your work. And, if you have
any questions or comments, feel free to leave them in the comments section
below.
Ken Flerlage, May 4, 2020


Hi, i really like this website, lots of things to learn. is there anywhere that i can download the data sources which you are working with.....
ReplyDeletenot just for this post but for the other one as well
Thanks
Pouya
I need to start making these publicly available. In the meantime, if you have any data sources you'd like, please email me (flerlagekr@gmail.com) and I'd be happy to send them to you.
DeleteHello,
ReplyDeleteI was trying to follow along this the process in Tableau prep.
However, all of my data is in one table, so after I have split and pivoted my data I cannot join the two tables as you have.
Does this mean I should split my Excel file into multiple sources before I start this process.
In my table I have 4 columns that need to go through this process, do I do each one individually and does this require splitting these 4 columns off in Excel to have a total of 5 tables?
This sounds like a somewhat complex scenario. If you have 4 columns that all need to be split and pivoted individually, then that could be tricky. You'll need to do this process on each of the fields, then join them back together at the end. To do that, you'll need each record to have some sort of unique ID. If you don't have that in your data, you could generate one using ROW_NUMBER(). I'd be happy to help with this further. Feel free to email me at flerlagekr@gmail.com.
DeleteWhat is [Table Name] used in Invite calculated field?
ReplyDeleteThat is created when you union multiple tables in Tableau.
DeleteBut how and where is that column [Table Name] created?
DeleteFirst it doesn't appear (after the "custom split") but then you use it when you're creating the calculated "Invite" field
When you union tables together, Tableau automatically creates the "Table Name" field, which indicates which of the unioned tables you're working with.
Deletewhich tables did you union to get the column[table name]?
DeleteThe Events table.
DeleteCan you please elaborate how you union the Events table in order to get the [Table Name]?
DeleteSee https://help.tableau.com/current/pro/desktop/en-us/union.htm
DeleteIs there some method to pivot rows to columns (with designating columns as id columns) in Tableau desktop? If yes, please share the methodology.
ReplyDeleteI don't quite understand what you're asking. Can you clarify?
DeleteHello, Thank You in advance I am getting an error when trying to do step to have just one invite for each row: the case statement throw an error saying: "Expected type table found string. Comparison in "CASE" expression must betable type.
ReplyDeleteI am trying to split a column that has mutilpe string tags attached to each row for e.g:
Tags
['children', 'creativity', 'culture', 'dance', 'education', 'parenting', 'teaching']
Please email me. flerlagekr@gmail.com
DeleteHi Ken
ReplyDeleteI am working on 4 tables at a time using the relationship method. The Tableau Prep worked well for me until I was asked to have my dashboard connected to a live data source which refreshes the data after a certain interval. In this case, Tableau Prep won't work anymore.
Will your first suggestion work well with live data source having multiple table joins? To give some background, I have 2 years of ticket data which has a field called department separated by comma. I need individual rows for each of the department - the ticket number will remain the same.
It might work, but I'd probably need to see the data to be sure.
DeleteSo I tried your solution above but it isn't working.. the output view looks very similar to what you have except that my "Invite" data is broken down and visible into only one table "Event". It's all null in the "Events 1" Events 2" table. Could you please suggest what else can do? I can send you a piece of data over email but not sure how we can mimic the database connection here.
DeleteI'd probably need to see the data. Any chance you can mock up some fake data in Excel or csv then email me? flerlagekr@gmail.com
DeleteHello, guys.
DeleteFirst of all, thank you for your great article.
I have same issue with Manisha.
I connected to live data which updates everyday.
After I split and pivot data, that new data source is not live anymore.
Have you guys figured out this?
I don't see what could be causing this. Any chance you could provide a sample packaged workbook and/or steps to reproduce the issue?
DeleteHi Manisha, did you ever find a resolution?
DeleteExcellent article. Saved me a ton of time by convincing me that I should go straight to T Prep rather than messing w custom splits in Desktop. Thanks, Ken!
ReplyDeleteThanks for the helpful post! I'm trying to avoid using T Prep so that when I hand this project over, it's not necessary. BUT... there are 130+ IDs and some of the 450 items have 30+ IDs to split so I'm not sure about the T Desktop method. Any guidance on weighing the pros and cons for a specific case?
ReplyDeleteYikes! I wonder if you'd be able to email me and share a sample of your data? I'd like to take a look and see what other options might be available. flerlagekr@gmail.com
DeleteThanks Ken, thats very helpful. I am very close to the solution but I got the same problem as the guy above had, which I couldn't figure out how to create the "table name" for the case function. You mentioned it can be done by performing union to itself, but doesn't doing union require specific condition setting? I am a bit confused
ReplyDeleteUnion is different from a join. Union just stacks the two data sets on top of each other. No condition is required. See https://help.tableau.com/current/pro/desktop/en-us/union.htm
DeleteHi Ken, could you explain how you can you have 'Table Name'? with Tableau Desktop?
ReplyDeleteThat field is created when you perform a union in Tableau.
Delete