
Duplicate Your Add/Show Buttons for THE BEST User Experience

Just recently at the Tableau Conference in 2023, Ken and I were lucky enough to get to present "How To do Cool Stuff 2023" to two large audiences. Ken showed a bunch of mapping techniques then brought the house down with his synchronized scrolling trick while I showed a number of design tips and finished off the presentation with some random tips.
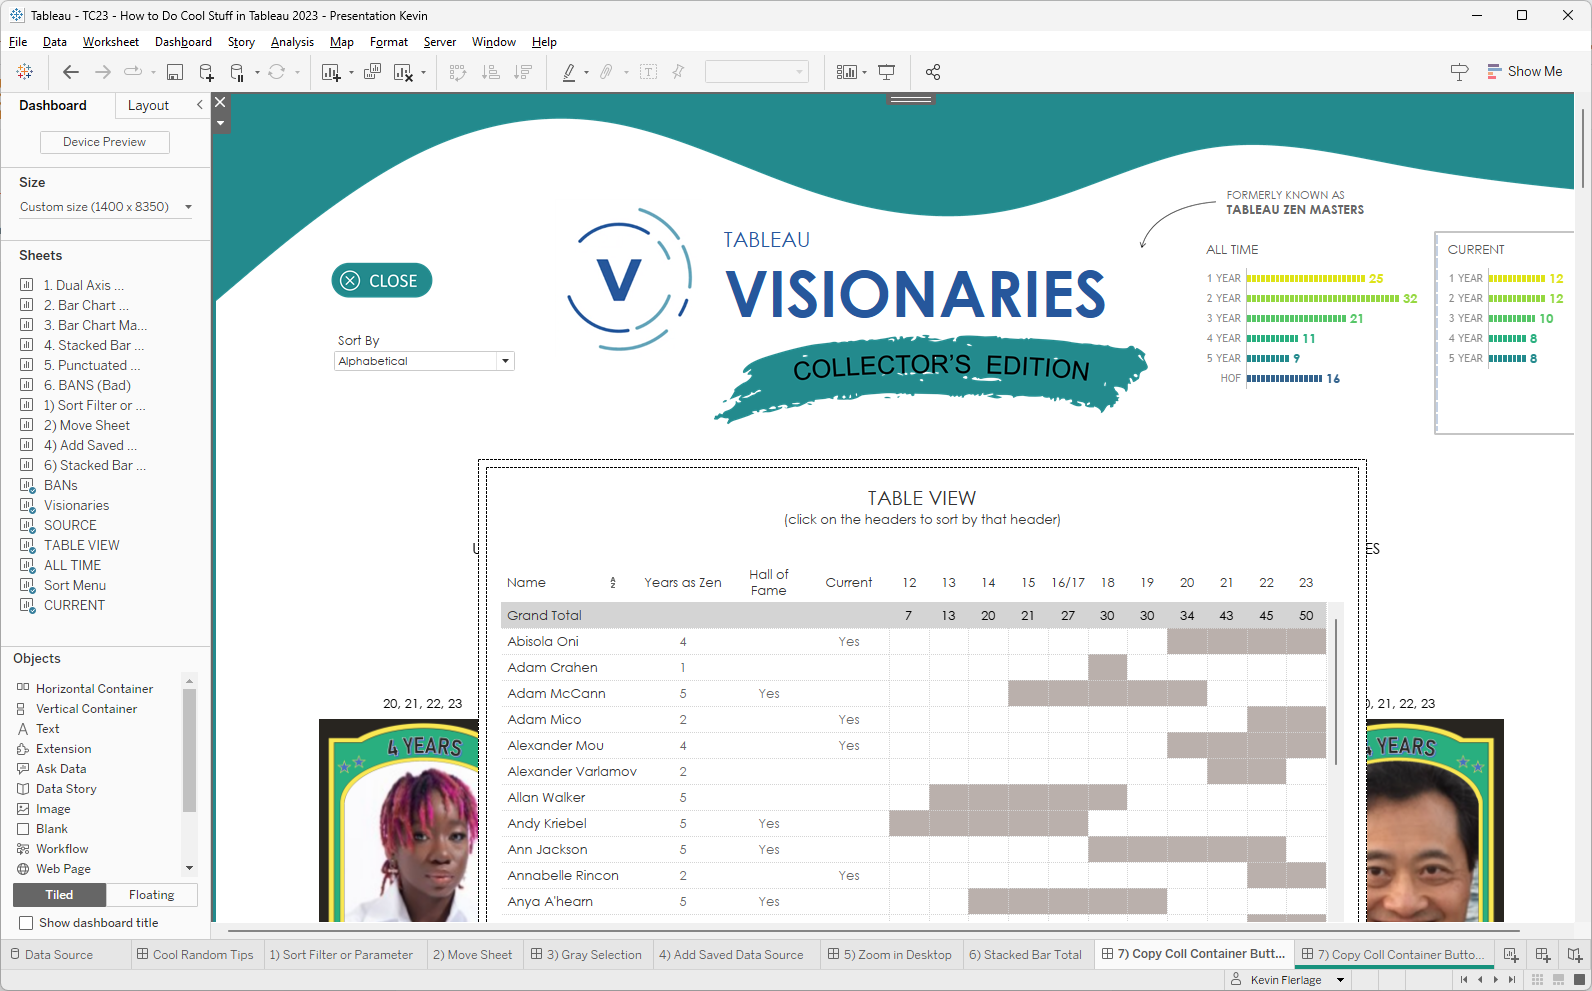
One of the tips I showed was that you can add a show/hide button to a container then make a copy of the show/hide button, paste it and you now have two buttons that can control a single container. In fact, you can paste that button onto a separate dashboard and still control that container. Below is a short gif showing how this works (using my Tableau Visionaries dashboard as an example).
In the example, I show me opening and closing a container with a show/hide button. I then copy the button and paste it using CTRL V (on a PC). I then paste that same button onto a duplicated dashboard and although the button doesn't change when clicked, it still opens and closes that container on a different dashboard.

When I showed this at the conference, I didn't have any good use case for creating multiple show/hide buttons (on the same dashboard or another dashboard). After the conference, I received a message from Desireé Abbott with an AMAZING USE CASE for this copying and pasting of show/hide buttons. Thank you Desireé for this fantastic idea and for allowing me to share it with everyone. In a minute, I'll show you this use case and how to create it, but first, I want to give a bit of background on why I think this is so amazing.
So, when you open a window on your computer, what always shows at the top/right? An X to close the window, right? In fact, let me go click the Excel icon to open Excel. I click the icon on my taskbar, Excel opens, then to close it, I click the X at the top right. Now let's go into Tableau, go to a dashboard, go to the Dashboard menu then choose Actions. I can do what I need to do here, then I click the X at the top of that window to close it (as shown below).
Okay, what the heck am I getting at? Well, to open an application, a browser, a menu inside of an application, etc., I open it in one place and close it using the X. Every single time! However, when we use the show/hide button option in Tableau, one button opens AND closes - it does both. It would be like opening Excel by clicking the Excel icon then to close Excel, I click the Excel icon again. This would be fine, but it's not how we've all been doing it for 10, 20, 30 years. We open something on our computer by clicking an icon, a menu, a file, whatever, but we almost always close it using the X at the top right corner. So if we were able to do this with the show/hide buttons in Tableau, that would immediately improve the end-user experience as this is what every computer user in the world is used to doing.
So that's exactly what Desireé Abbott did. She sent me a mocked up version where a user would click a button to open a container then click an X within the container to close it - just like we all do hundreds of times each day. I went ahead and built this into my Tableau Visionaries dashboard (for the sake of consistency). Check out what the final version looks like then I will show you how to build it (spoiler alert, it requires copying and pasting a show/hide button).

I know that I keep gushing over this, but I love the user experience so much. It's just so natural to all of us. So how do we build it? Let's first start where we started before, we have a container with a show/hide button. When the container is closed, the button simply says "Table" and when the container is open, the button says "Close" as shown below:

So next, let's copy the show/hide button by either clicking the arrow and choosing "Copy Dashboard Item" or by selecting the button and just clicking CTRL C (on PC). Next, paste the item onto the same dashboard by clicking CTRL V. The gif will show these steps.

Now, lets make some minor changes to the images used for the buttons. If we look at the final result above, when we click on the first Table button and the container opens, that button disappears. It doesn't actually disappear, instead, we utilize a transparent shape when the container is open (for more information on what a transparent shape is an some additional use cases, see our transparent shapes blog post). So, for the first button, we will change the shape when the container is open to be a transparent shape. For the second button, we will change the shape when the container is open to be an X shape and when it's closed, that button will use the transparent shape. Let's go over that again, the first button will show as Table and when it is clicked (and the container opens), it will show as transparent. The second button will show as transparent until that first button is clicked (and the container opens) then it will show as the X. Make sense? I should note that both buttons will continue to work to open and close, but since you are using a transparent shape, most users will have not clue that is possible (which is what we want). Below is a walkthrough of it.

The last step is to simply tile that X button into the container that is opened and closed.
And that's it! It's a simple technique and adds so much to the end user's experience. Moving forward, I will be doing this for every single collapsible container I create. Before we go, I just want to, once again, thank you Desireé Abbott for the amazing use case! Thank you!
Need help with anything related to Tableau? Through Moxy Analytics, Ken and I provide consulting services such as Tableau Lifeline (get us for 1 hour to help solve sticky problem), Fractional Data Here (get us on your team for N number of hours a month for whatever you want us for), Tableau Training, and of course, project work. Click the Icon below if you are interested.
Kevin Flerlage, July 10, 2023
Twitter | LinkedIn | Tableau Public


Simple yet effective. I used this technique with a floating panel that covers the entire dashboard. I then tile it with my menu/close button box surrounded by blank 80% opacity tiles to create a shadow-box look to the menu and blur out the background. Works great, thanks for the tip.
ReplyDeleteThat’s an awesome UX tip, Kevin! Duplicating the add/show buttons across dashboards is such a smart way to improve navigation and accessibility—especially for users who may not land on the main view first. It’s little touches like these that really elevate the overall interactivity of Tableau dashboards. I’ve seen a similar concept used in file management tools too—like how the software DuplicateFilesDeleter mirrors controls for easier bulk actions across folders. Love seeing practical design insights that make interfaces more intuitive. Thanks for sharing this one!
ReplyDeleteThank you, Jason!
Delete